搞事情系列文章主要是为了继续延续自己的 “T” 字形战略所做,同时也代表着毕设相关内容的学习总结。本文是实现项目中一个选择器组件引发的思考。
前言 有人说过“一个好的产品通常会在一些细节的处理上取胜”,这一点非常好的在我身上进行了验证。在去年完成了一版选择器的设计后(详情见此文章 ),现如今进行了第二版的实现。
看到设计图后,我不禁感叹,设计小哥的脑洞真是大的可以,完全抛弃了常规的选择器设计。
与 UI 确认了动效后,脑海里立马浮现了“我不要自己写!”的想法,但很快又意识到估计不会有这种开源组件可以用。总之给自己埋下了这是整个项目中最难实现动效之一的种子。
调研 不出所料,在 github 上尝试搜索过了 picker,swpier,slider 等众多与选择器相关的关键词后均无果,甚至还尝试改造了 collectionView 中间放大的组件,但一番操作后,发现实在是不堪入目。
经历过这次的改造后,发现 collectionView 中间视图放大的效果是基于动态改变出现 cell 的 scale 属性去做的,开始萌生了干脆自己写一个得了。
思考 盯着设计图看了好久,反复琢磨动效。最后自己总结出以下几种实现思路:
使用 UICollectionView 集合余弦定理做 scale 变换,可以随便找一个开源组件做二次开发(时间最短)。
使用 UICollectionView,每个 cell 都是一样大小,中间部分做“放大镜”效果,把整个 collectionView 做 3D 转换变为从带深度的一个滚轮,每次滚动都只是在修改 x 轴上的内容,z 轴和 y 轴不动(效果最好)。
使用 UIScrollView 做“轮播图”效果,所有东西都需要自己来(实现最简单)。
其实我大部分的时间都花在了第一种方案上,因为实际动效跟第一种方案完全一致,只不过 cell 特别小就是了。但前面也说过了在尝试过二次修改几个开源组件后,发现效果实在是惨不忍睹,遂放弃;第二种方案是自己独创的,也是因为动效特别像一个垂直于屏幕的滚轮,但做过 3D 变换的同学也是知道需要调整很多参数,实在是得不偿失。
最好用了一个最简单直接方法,用 UIScrollView 硬造。
实现 第一步 首先需要把素材都准备好,我很快的写出了把所有子视图排布在 scrollView 中的代码。
1
2
3
4
5
6
7
8
9
10
11
12
13
14
15
16
17
18
private func initView () { let scrollView = UIScrollView (frame: CGRect (x: 0 , y: 0 , width: pj_width, height: pj_height)) scrollView.showsHorizontalScrollIndicator = false scrollView.showsVerticalScrollIndicator = false addSubview(scrollView) var finalW: CGFloat = 0 for index in 0 ..< pickCount { let inner = 10 let sv = UIView (frame: CGRect (x: 10 + index * inner, y: Int (scrollView.pj_height / 2 ), width: 1 , height: 4 )) sv.backgroundColor = .lightGray scrollView.addSubview(sv) if index == pickCount - 1 { finalW = sv.right } } scrollView.contentSize = CGSize (width: finalW, height: 0 ) }
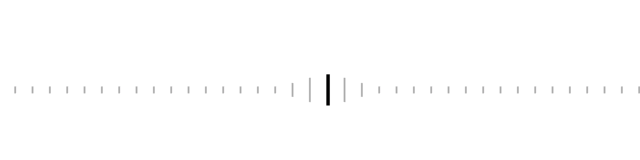
第二步 需要把靠近屏幕中间的几个视图按规则进行拉高。花费了一些时间来寻找把中间视图拉高的参数,调整了一下。
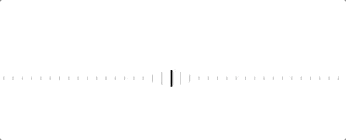
1
2
3
4
5
6
7
8
9
10
11
12
13
14
15
16
17
18
19
20
21
22
23
24
25
26
27
28
29
30
31
32
33
34
35
36
37
38
39
40
41
42
43
44
45
46
47
48
49
50
51
52
53
54
55
private func initView () { let scrollView = UIScrollView (frame: CGRect (x: 0 , y: 0 , width: pj_width, height: pj_height)) scrollView.showsHorizontalScrollIndicator = false scrollView.showsVerticalScrollIndicator = false addSubview(scrollView) var finalW: CGFloat = 0 for index in 0 ..< pickCount { let inner = 10 let sv = UIView (frame: CGRect (x: 10 + index * inner, y: Int (scrollView.pj_height / 2 ), width: 1 , height: 4 )) sv.backgroundColor = .lightGray sv.tag = index + 100 scrollView.addSubview(sv) if abs (sv.centerX - centerX) < 5 { sv.pj_height = 18 sv.pj_width = 2 sv.backgroundColor = .black centerView = sv } else if abs (sv.centerX - centerX) < 16 { sv.pj_height = 14 sv.pj_width = 1 } else if abs (sv.centerX - centerX) < 26 { sv.pj_height = 8 sv.pj_width = 1 } else { sv.pj_height = 4 sv.pj_width = 1 } sv.y = (scrollView.pj_height - sv.pj_height) * 0.5 if index == pickCount - 1 { finalW = sv.right } } scrollView.contentSize = CGSize (width: finalW, height: 0 ) }
第三步 滚动时需要实时计算中间区域视图的高度。有了初始化视图时的判断条件,直接拿来用即可,只不过需要加上 scrollView 滑动的 x 轴偏移量。
1
2
3
4
5
6
7
8
9
10
11
12
13
14
15
16
17
18
19
20
21
22
23
24
25
26
27
28
29
30
31
32
33
34
35
36
37
38
extension PJRulerPickerView : UIScrollViewDelegate { func scrollViewDidScroll (_ scrollView : UIScrollView ) { let offSetX = scrollView.contentOffset.x let _ = scrollView.subviews.filter { if abs ($0 .centerX - offSetX - centerX) < 5 { $0 .pj_height = 18 $0 .pj_width = 2 $0 .backgroundColor = .black } else if abs ($0 .centerX - offSetX - centerX) < 16 { $0 .pj_height = 14 $0 .pj_width = 1 $0 .backgroundColor = .lightGray } else if abs ($0 .centerX - offSetX - centerX) < 26 { $0 .pj_height = 8 $0 .pj_width = 1 $0 .backgroundColor = .lightGray } else { $0 .pj_height = 4 $0 .pj_width = 1 $0 .backgroundColor = .lightGray } $0 .y = (scrollView.pj_height - $0 .pj_height) * 0.5 return true } } }
第四步 做到这基本上就简单的完成了需求,一点都不复杂有没有!!!真是不知道为什么要花费大半天的时间去找开源库,去做二次开发。
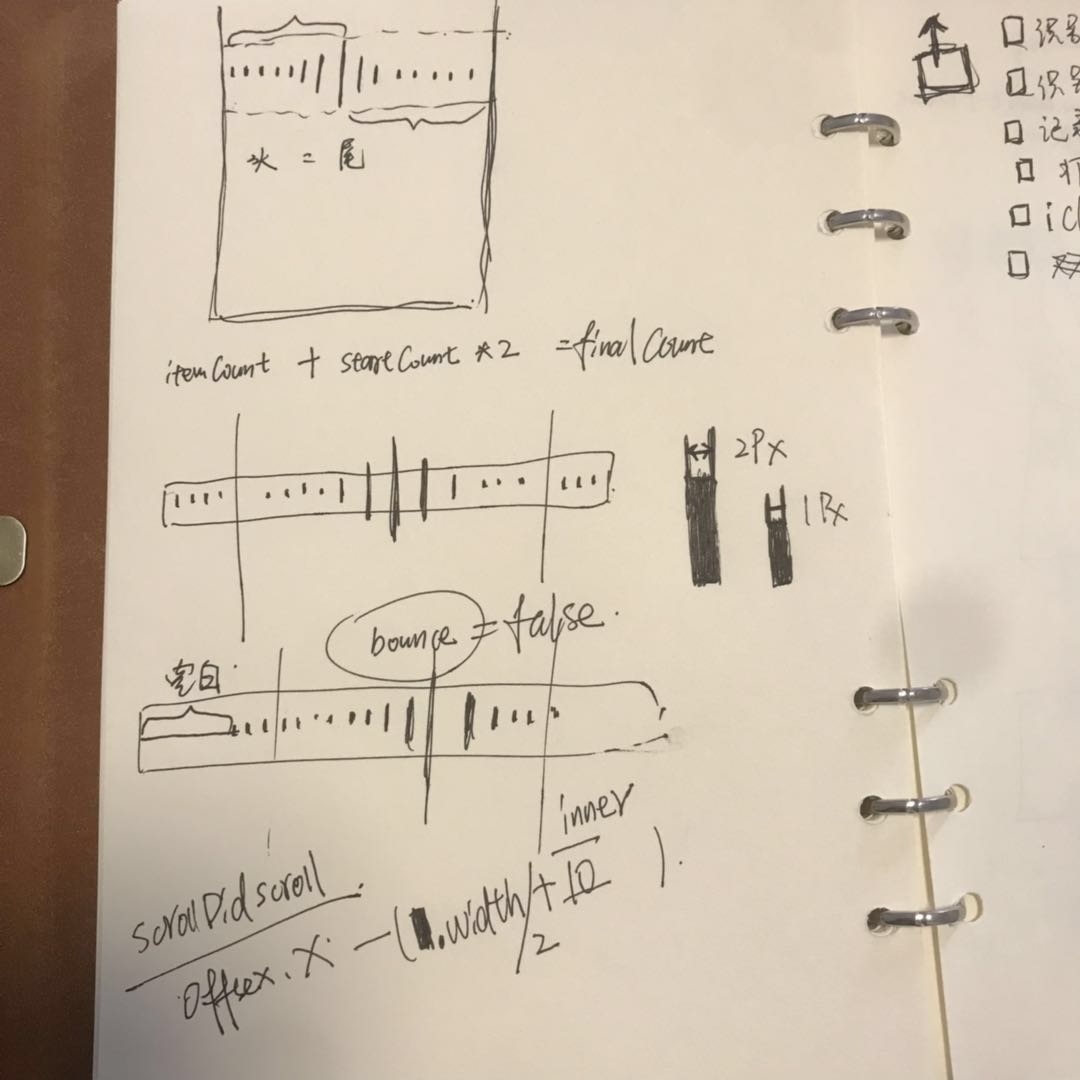
在向 UI 确定动效的过程中,被告知左右两边的视图不能被“拖没”,意思就是关闭“弹簧效果”,使用 scrollView.bounces = false 属性进行关闭。
此时发现允许用户拨动 100 次,但因为“弹簧效果”的关闭导致了可滚动的内容变少了。思考了一下后,运用了一些简单的数学计算让 scrollView 多渲染了头部和尾部占据的滚动内容。
1
2
3
4
5
6
7
8
9
10
11
12
13
14
15
16
17
18
19
20
21
22
23
24
25
26
27
28
29
30
31
32
33
34
35
36
37
38
39
40
41
42
43
44
45
46
47
48
49
50
51
52
53
54
55
56
57
58
59
60
61
62
63
private func initView () { let scrollView = UIScrollView (frame: CGRect (x: 0 , y: 0 , width: pj_width, height: pj_height)) addSubview(scrollView) scrollView.delegate = self scrollView.showsHorizontalScrollIndicator = false scrollView.showsVerticalScrollIndicator = false scrollView.bounces = false startIndex = (Int (ceil(centerX / 10.5 )) + 1 ) pickCount += startIndex * 2 var finalW: CGFloat = 0 for index in 0 ..< pickCount { let inner = 10 let sv = UIView (frame: CGRect (x: 10 + index * inner, y: Int (scrollView.pj_height / 2 ), width: 1 , height: 4 )) sv.backgroundColor = .lightGray scrollView.addSubview(sv) if abs (sv.centerX - centerX) < 5 { sv.pj_height = 18 sv.pj_width = 2 sv.backgroundColor = .black centerView = sv } else if abs (sv.centerX - centerX) < 16 { sv.pj_height = 14 sv.pj_width = 1 } else if abs (sv.centerX - centerX) < 26 { sv.pj_height = 8 sv.pj_width = 1 } else { sv.pj_height = 4 sv.pj_width = 1 } sv.y = (scrollView.pj_height - sv.pj_height) * 0.5 if index == pickCount - 1 { finalW = sv.right } } scrollView.contentSize = CGSize (width: finalW, height: 0 ) }
第五步 现在基本上解决了 UI 问题,最后只需要把用户拨动的次数暴露出去即可。思考了一会后,得出这么个结论:计算用户当前拨动选择器的次数,实际上就是计算中间视图“变黑”了几次。想明白后,我很快的写下了代码:
1
2
3
4
5
6
7
8
9
10
11
12
13
14
15
16
17
18
19
20
21
22
23
24
25
26
27
28
29
30
31
32
33
34
35
36
37
38
39
40
41
42
43
44
45
46
47
48
49
50
51
52
53
54
55
56
57
58
59
60
61
62
63
64
65
66
67
68
69
70
71
72
73
74
75
76
77
78
79
80
81
82
83
84
85
86
87
88
89
90
91
92
93
94
95
96
97
98
99
100
101
102
103
104
105
private func initView () { let scrollView = UIScrollView (frame: CGRect (x: 0 , y: 0 , width: pj_width, height: pj_height)) addSubview(scrollView) scrollView.delegate = self scrollView.showsHorizontalScrollIndicator = false scrollView.showsVerticalScrollIndicator = false scrollView.bounces = false startIndex = (Int (ceil(centerX / 10.5 )) + 1 ) pickCount += startIndex * 2 var finalW: CGFloat = 0 for index in 0 ..< pickCount { let inner = 10 let sv = UIView (frame: CGRect (x: 10 + index * inner, y: Int (scrollView.pj_height / 2 ), width: 1 , height: 4 )) sv.backgroundColor = .lightGray sv.tag = index + 100 scrollView.addSubview(sv) if abs (sv.centerX - centerX) < 5 { sv.pj_height = 18 sv.pj_width = 2 sv.backgroundColor = .black centerView = sv } else if abs (sv.centerX - centerX) < 16 { sv.pj_height = 14 sv.pj_width = 1 } else if abs (sv.centerX - centerX) < 26 { sv.pj_height = 8 sv.pj_width = 1 } else { sv.pj_height = 4 sv.pj_width = 1 } sv.y = (scrollView.pj_height - sv.pj_height) * 0.5 if index == pickCount - 1 { finalW = sv.right } } scrollView.contentSize = CGSize (width: finalW, height: 0 ) } extension PJRulerPickerView : UIScrollViewDelegate { func scrollViewDidScroll (_ scrollView : UIScrollView ) { let offSetX = scrollView.contentOffset.x let _ = scrollView.subviews.filter { if abs ($0 .centerX - offSetX - centerX) < 5 { $0 .pj_height = 18 $0 .pj_width = 2 $0 .backgroundColor = .black if centerView.tag != $0 .tag { centerView = $0 } } else if abs ($0 .centerX - offSetX - centerX) < 16 { $0 .pj_height = 14 $0 .pj_width = 1 $0 .backgroundColor = .lightGray } else if abs ($0 .centerX - offSetX - centerX) < 26 { $0 .pj_height = 8 $0 .pj_width = 1 $0 .backgroundColor = .lightGray } else { $0 .pj_height = 4 $0 .pj_width = 1 $0 .backgroundColor = .lightGray } $0 .y = (scrollView.pj_height - $0 .pj_height) * 0.5 return true } } }
我使用了一个中间变量去作为中间视图的引用,并在创建子视图时给其加上 tag 用于标记。思考了一下后,受到前几次的思考影响,导致了计算用户拨动过几次的方法也不假思索的做了一些数学计算,最后我是这么做的:
1
2
3
4
5
6
7
8
9
10
11
12
13
14
15
16
17
18
19
20
21
22
23
24
25
26
27
28
29
30
31
32
33
34
35
36
37
38
39
40
41
42
43
44
45
46
47
48
extension PJRulerPickerView : UIScrollViewDelegate { func scrollViewDidScroll (_ scrollView : UIScrollView ) { let offSetX = scrollView.contentOffset.x let _ = scrollView.subviews.filter { if abs ($0 .centerX - offSetX - centerX) < 5 { $0 .pj_height = 18 $0 .pj_width = 2 $0 .backgroundColor = .black if centerView.tag != $0 .tag { PJTapic .select() centerView = $0 print (Int (ceil($0 .centerX / 10.5 )) - startIndex) } } else if abs ($0 .centerX - offSetX - centerX) < 16 { $0 .pj_height = 14 $0 .pj_width = 1 $0 .backgroundColor = .lightGray } else if abs ($0 .centerX - offSetX - centerX) < 26 { $0 .pj_height = 8 $0 .pj_width = 1 $0 .backgroundColor = .lightGray } else { $0 .pj_height = 4 $0 .pj_width = 1 $0 .backgroundColor = .lightGray } $0 .y = (scrollView.pj_height - $0 .pj_height) * 0.5 return true } } }
在刚才写这篇文章时,我发现了一个特别傻的地方,我都已经把每个子视图所代表的位置记录进了 tag 中,为社么还要重新计算一遍当前中间视图的位置?意识到这个问题后,还修改了一些其它地方,最终 PJRulerPickerView 的全部代码如下:
1 2 3 4 5 6 7 8 9 10 11 12 13 14 15 16 17 18 19 20 21 22 23 24 25 26 27 28 29 30 31 32 33 34 35 36 37 38 39 40 41 42 43 44 45 46 47 48 49 50 51 52 53 54 55 56 57 58 59 60 61 62 63 64 65 66 67 68 69 70 71 72 73 74 75 76 77 78 79 80 81 82 83 84 85 86 87 88 89 90 91 92 93 94 95 96 97 98 99 100 101 102 103 104 105 106 107 108 109 110 111 112 113 114 115 116 117 118 119 120 121 122 123 124 125 126 127 128 129 130 131 132 133 134 135 136 137 138 139 140 141 142 143 144 145 146 147 148 149 150 151 152 153 import UIKitclass PJRulerPickerView : UIView { var moved: ((Int ) -> Void )? var pickCount = 0 private var centerView = UIView () private var startIndex = 0 override init (frame : CGRect ) { super .init (frame: frame) } required init? (coder aDecoder : NSCoder ) { fatalError ("init(coder:) has not been implemented" ) } convenience init (frame : CGRect , pickCount : Int ) { self .init (frame: frame) self .pickCount = pickCount initView() } private func initView () { let scrollView = UIScrollView (frame: CGRect (x: 0 , y: 0 , width: pj_width, height: pj_height)) addSubview(scrollView) scrollView.delegate = self scrollView.showsHorizontalScrollIndicator = false scrollView.showsVerticalScrollIndicator = false scrollView.bounces = false startIndex = (Int (ceil(centerX / 10.5 ))) pickCount += startIndex * 2 + 1 var finalW: CGFloat = 0 for index in 0 ..< pickCount { let inner = 10 let sv = UIView (frame: CGRect (x: 10 + index * inner, y: Int (scrollView.pj_height / 2 ), width: 1 , height: 4 )) sv.backgroundColor = .lightGray sv.tag = index + 100 scrollView.addSubview(sv) if abs (sv.centerX - centerX) < 5 { sv.pj_height = 18 sv.pj_width = 2 sv.backgroundColor = .black centerView = sv } else if abs (sv.centerX - centerX) < 16 { sv.pj_height = 14 sv.pj_width = 1 } else if abs (sv.centerX - centerX) < 26 { sv.pj_height = 8 sv.pj_width = 1 } else { sv.pj_height = 4 sv.pj_width = 1 } sv.y = (scrollView.pj_height - sv.pj_height) * 0.5 if index == pickCount - 1 { finalW = sv.right } } scrollView.contentSize = CGSize (width: finalW, height: 0 ) } } extension PJRulerPickerView : UIScrollViewDelegate { func scrollViewDidScroll (_ scrollView : UIScrollView ) { let offSetX = scrollView.contentOffset.x let _ = scrollView.subviews.filter { if abs ($0 .centerX - offSetX - centerX) < 5 { $0 .pj_height = 18 $0 .pj_width = 2 $0 .backgroundColor = .black if centerView.tag != $0 .tag { PJTapic .select() centerView = $0 moved? ($0 .tag - 100 - startIndex) } } else if abs ($0 .centerX - offSetX - centerX) < 16 { $0 .pj_height = 14 $0 .pj_width = 1 $0 .backgroundColor = .lightGray } else if abs ($0 .centerX - offSetX - centerX) < 26 { $0 .pj_height = 8 $0 .pj_width = 1 $0 .backgroundColor = .lightGray } else { $0 .pj_height = 4 $0 .pj_width = 1 $0 .backgroundColor = .lightGray } $0 .y = (scrollView.pj_height - $0 .pj_height) * 0.5 return true } } }
总结 完成 PJRulerPickerView 组件后我才意识到,其实遇到问题前应该先仔细的把问题在脑海在全盘推导一番,看看真正的核心问题是什么,而不是像我之前一样花费了大半天的时间漫无目的的寻找开源组件库。
这个组件不难,但给我自己的影响非常大,让我意识到了不要妄自菲薄。